Thinking of creating a website and tech talk makes your head spin? Don’t worry. With WordPress, building a website is easier than you think. WordPress stands out as a top choice, is renowned for its versatility and customization capabilities, and powers over 43% of the internet. Many have made websites without any tech background, and with this guide, you can too. We’ve put together a step-by-step guide about How to build a WordPress website from scratch, no coding needed.
This guide is for everyone, whether you’re just starting out or have dabbled in the digital world before. Let’s get started on making your website.
How to Build a WordPress Website: Step-by-Step
Laying the Groundwork
Building a WordPress website is akin to constructing a house. Before you focus on aesthetics and interior design, you need a solid foundation.
Set Clear Website Goals
Every successful endeavor starts with a clear vision. When it comes to building a website, understanding its purpose is paramount. Is it an online portfolio, an eCommerce store, a blog, a nonprofit website, or a corporate site? By defining the website’s objectives, you can tailor its design, content, and functionalities to meet those specific goals. Furthermore, understanding your target audience ensures that the website resonates with them, leading to higher engagement and conversions.
Allocate Budget: How Much Does it Cost to Create a WordPress Website?
Building a website comes with a set of expenses. However, with strategic planning, you can get the best value for your money. Here’s a breakdown of potential costs:
- Domain Registration: Your website’s address on the internet. While some platforms, like WordPress.com, offer ways to register a domain, choosing a name that aligns with your brand is essential. Costs can range from $10 to $50 annually, but there are ways to secure a domain for free or at discounted rates.
- Web Hosting: This is where your website’s files are stored. Depending on your site’s needs (traffic, type of content, security requirements), hosting can cost anywhere from $3 to $500 a month. Remember, the cheapest option isn’t always the best. Consider factors like uptime, customer support, and scalability.
- Design and Themes: While numerous free themes are available, premium themes offer more customization options and often come with dedicated support. Prices can range from $30 to $200.
- Plugins and Extensions: These enhance your website’s functionality. While many essential plugins are free, specialized features might come at a cost, ranging from $15 to $200 or more.
- Maintenance and Updates: Websites aren’t a one-time investment. Regular updates, backups, and potential redesigns can incur additional costs.
By estimating these costs, you can allocate a budget, ensuring your website is functional and aligned with your vision without unnecessary expenditures.
Crafting Your Brand’s Online Identity
Establishing Your Brand
Your brand is more than just a name or a logo; it’s the essence of who you are and what you represent. It’s the first impression visitors have, and it sets the tone for their entire experience on your site.
Choosing a Name for Your Site
Start with brainstorming. What do you want your site to convey? Is it personal, professional, playful, or profound? Your site’s name should resonate with its purpose and your target audience. It should be memorable, easy to spell, and reflect your brand’s essence.
Choose a Domain Name
Your domain name is your digital address, and the URL visitors type into their browsers to find you. A catchy and relevant domain name enhances brand recall, lends credibility, and can even boost search engine rankings. Think of it as the storefront sign of your digital shop.
How to Strategically Choose a Domain Name?
A memorable domain name sticks in the minds of visitors, increasing the chances of repeat visits. But what makes a domain name memorable? Simplicity, relevance, and originality are key. Avoid complex words or phrases, and opt for something that resonates with your brand’s message and values.
Choosing a trendy or catchy custom domain name is tempting, but it’s essential to consider longevity. Avoid using slang or terms that might become outdated quickly. Additionally, steer clear of names that are hard to spell or pronounce. Remember, your domain name is often shared verbally or over the phone, so clarity is crucial.
While .com is the most popular domain extension, numerous other options are available, such as .net, .org, .blog, and even industry-specific ones like .design or .tech. Choose an extension that aligns with your business type and audience.
Selecting the Right Web Hosting Provider
Web hosting is the backbone of your website. It’s where all your site’s files, data, and content reside. The quality of your web hosting directly impacts your site’s speed, security, and uptime. Users expect fast-loading, and always-accessible websites, so choosing the right hosting is paramount.
Also read, 10 Best SEO Web Hosting Providers
Different Types of Hosting Explained
Shared Hosting
Ideal for beginners, shared hosting is where multiple websites share the same server resources. It’s cost-effective but might suffer from slower speeds if one of the sites on the server experiences a traffic surge.
VPS (Virtual Private Server) Hosting
A middle-ground option, VPS hosting offers more resources than shared hosting. It’s suitable for websites that have outgrown shared hosting but don’t need a dedicated server.
Dedicated Hosting
As the name suggests, dedicated hosting provides a server dedicated solely to your website. It offers optimal performance and security but comes at a higher cost.
Cloud Hosting
A more modern approach, cloud hosting, involves a network of servers. Your site’s data is spread across multiple servers, ensuring high availability and scalability.
Factors Influencing Hosting Choice
Your choice of hosting depends on several factors:
- Traffic: High-traffic sites might require VPS or dedicated hosting to handle the volume of visitors.
- Website Type: An e-commerce site with lots of product images and videos might need more resources than a simple blog.
- Budget: While choosing quality hosting is essential, it’s equally important to find a solution that fits your budget.
- Technical Expertise: Some hosting types, like dedicated hosting, might require some technical knowledge to manage.
Host Duplex’s Edge in Web Hosting At Host Duplex, we understand the intricacies of web hosting. Our range of hosting solutions caters to all types of websites, ensuring optimal performance, security, and uptime. With 24/7 customer support and a commitment to excellence, we’re here to ensure your website’s success.

WordPress Installation
WordPress has revolutionized the way we create websites. Its user-friendly interface and vast customization options make it a top choice for beginners and professionals alike. But before you can start designing your dream website, you need to install WordPress. Let’s break down the process.
WordPress.com vs. WordPress.org: What’s the Difference?
It’s important to understand the distinction between WordPress.com and WordPress.org before installing WordPress.
- WordPress.org: This is the self-hosted version where you host your own website through a third-party hosting provider. It offers more flexibility, but you’re responsible for managing your server, domain, and other technical aspects.
- WordPress.com: Here, WordPress hosts the website for you. It’s more hands-off, but your website’s URL will have a “.wordpress.com” suffix unless you upgrade.
Choosing Between WordPress.org and WordPress.com
Your choice depends on your needs:
- Opt for WordPress.org if you want full control over customization and are comfortable managing technical aspects. It’s free, but you’ll incur costs for hosting, domain, and other website-related expenses.
WordPress.com is ideal if you prefer an all-in-one solution. The free version has limitations, but you can upgrade for more features and control.
Step-by-Step WordPress Installation Process
- Download WordPress: Head to WordPress.org and download the latest version.
- Upload to Your Web Host: Using an FTP client, upload the WordPress files to your web host.
- Create a Database: Access your hosting control panel and create a new database for WordPress.
- Run the Installation: In your web browser, navigate to your domain. The WordPress installation screen will greet you. Follow the prompts, inputting database details when asked.
- Complete the Installation: Fill in site details, including the site title, admin username, and password. Remember to store these securely.
WordPress Admin Dashboard
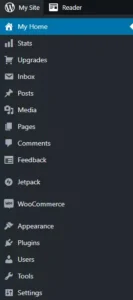
Once installed, you can access your site’s backend or WordPress dashboard by appending /wp-admin to your domain. The dashboard is your control room. From here, you can create content, install plugins, customize your site’s appearance, and much more. Familiarize yourself with the left-hand menu, as this will be your primary navigation.
Design Your Website
Choose the Right WordPress Theme
WordPress themes are not just about aesthetics; they shape the user experience, functionality, and even the speed of your site. It’s the foundation of your website’s design, affecting everything from user experience to SEO. The right theme can elevate your brand, while the wrong one can deter visitors.
When considering themes, it’s essential to differentiate between free themes and premium themes. While a free theme offers a cost-effective solution, the premium theme often comes with additional features, support, and customization options that can further enhance your website’s potential.
Evaluating Themes: Key Considerations
- Speed: A slow-loading website can frustrate users and harm your SEO rankings. Test its speed before settling on a theme using speed testing tools like Google PageSpeed Insights.
- Responsiveness: With many devices available, from smartphones to desktops, your website must look and function flawlessly on all of them. A responsive theme adjusts to different screen sizes, ensuring a consistent user experience.
- Customization Options: Your website should be a reflection of your brand. Themes with extensive customization options allow you to tweak design elements to align with your brand’s identity.
Also read, Best 14 Highly Customizable WordPress Themes in 2023
Personalization Hacks for a Unique Look
While themes provide a foundation, personalization is the key to standing out:
- Child Themes: These are sub-themes derived from a parent theme. They allow you to modify the parent theme without affecting its core files. This way, you can update the parent theme without losing your customizations.
- Custom CSS: If you have some knowledge of CSS, you can further tweak your theme’s appearance. From changing fonts to adjusting layouts, the possibilities are endless.
- Page Builders: Tools like Elementor and WPBakery Page Builder offer drag-and-drop interfaces for designing pages. They come with many widgets and design elements, enabling you to craft unique layouts.
Design for Each Essential Page
Every website has a few essential pages, and each serves a unique purpose. Here’s how to craft them:
Home Page
This is the first impression visitors have of your website. It should clearly communicate who you are, what you offer, and what action you want visitors to take.
Designing Your Homepage
Your homepage is the digital face of your brand. It’s often the first page visitors see, making its design and content crucial. A well-designed homepage can captivate visitors, encourage them to explore further, and even convert them into customers or subscribers. It should reflect your brand, provide essential information, and guide visitors to their next action.
Customizing the Front Page Using Blocks
With WordPress’s Gutenberg editor, customizing your homepage is a breeze. Use blocks to add text, images, videos, and more. Simply click the ‘+’ icon in the editor to add a new block and drag to rearrange.
Crafting Your Website’s Content
Content is king. It’s how you communicate with your audience, provide value, and establish authority in your niche.
Creating Your First Post
Start with a compelling title. Use headings (H2, H3) to structure your content. Make paragraphs short and readable. Use bullet points or numbered lists to present information clearly. And always, always proofread. A post with only text can be monotonous. Break it up with relevant images, infographics, or videos. Ensure you have the rights to use any media you upload.
Adding Images, Galleries, Videos, and More
Visual content enhances user engagement. Use the ‘Image’ block to add single images, ‘Gallery’ for multiple images, and ‘Video’ to embed videos. Remember to optimize images for the web to ensure fast loading times.
CTAs and User Engagement Elements
Call-to-Actions (CTAs) guide users toward your goal. Whether it’s signing up for a newsletter, making a purchase, or contacting you, CTAs play a crucial role.
- Clear and Concise: Your CTA should be straightforward. Use action words like “Buy Now,” “Sign Up,” or “Contact Us.”
- Visually Striking: CTAs should stand out but still fit with the overall design of your website.
- Strategically Placed: Position your CTAs where they’ll have the most impact, like at the end of a blog post, on product pages, or in the website header.
Additionally, engage users with interactive elements like polls, quizzes, and comment sections. These enhance user experience and increase the time spent on your site.
Setting Up Navigation
Well-structured navigation ensures your visitors can easily find what they’re looking for, enhancing user experience and retention.
User-Friendly Menu: A confusing or cluttered menu can frustrate visitors, leading to increased bounce rates. A clear, logical menu structure guides visitors, encouraging them to explore more of your content.
Adding Links to Your Created Pages: In your WordPress dashboard, navigate to Appearance > Menus. Here, you can create and customize your site’s menus. Add links to your core pages, arrange them in a logical order, and even create dropdowns if needed.
Designing Other Core Pages
- About Page: Share your story, mission, and vision. This page helps build trust and connect with your audience on a personal level.
- Product/Service Pages: Clearly showcase what you offer. Use high-quality images, detailed descriptions, and customer testimonials to build credibility.
- Blog: Share valuable insights, tips, and updates. This not only positions you as an expert in your field but also helps with SEO.
- FAQ Page: Address common questions and concerns. This reduces the barrier to purchase and improves user experience.
- Contact Page: Make it easy for visitors to get in touch. Include multiple contact methods like email, phone, and a contact form.
Each page should have a clear purpose and call to action. Use a clean layout, intuitive navigation, and high-quality visuals. Ensure consistency in design across all core pages for a cohesive user experience.
Supercharge Website Functionality
WordPress Plugins
Plugins are software components that integrate seamlessly with your WordPress site, allowing you to add features like contact forms, SEO tools, performance optimization, e-commerce capabilities, and more. They save you from coding complexities, offering solutions with just a few clicks.
Why Plugins Matter
Plugins allow you to add a wide range of functionalities to your website without any coding knowledge. From SEO tools to social media sharing buttons, there’s a plugin for almost everything. They enable you to tailor your website to your specific needs, ensuring you offer a unique experience to your visitors. Additionally, as your website grows, your needs might change. Plugins can help you scale your website functionalities in line with your growth.
While the right plugins largely depend on your website’s purpose, here are some universally beneficial ones:
This plugin helps you optimize your website for search engines, ensuring you rank higher and attract more organic traffic.
Speed is crucial for user experience and SEO. This plugin helps in improving website load times.
With cyber threats on the rise, this plugin offers a firewall and malware scanner to protect your website.
Allows you to add a contact form to your website, making it easier for visitors to get in touch.
If you’re looking to set up an online store, this is the go-to plugin. It’s feature-rich and highly customizable.
This plugin checks comments and contact form submissions against a global database of spam, ensuring your website remains spam-free.
Read out 10 Must-Have WordPress Plugins in 2023
Striking the Right Balance
While plugins offer incredible functionalities, it’s essential to strike a balance. Installing too many can slow down your website and even lead to compatibility issues. Here are some tips:
- Quality Over Quantity: Only install plugins that you genuinely need. Every plugin adds some amount of code to your website, which can affect performance.
- Regular Updates: Developers frequently release updates for plugins to fix bugs, add new features, or improve performance. Ensure all your plugins are up-to-date.
- Review and Ratings: Before installing a plugin, check its reviews and ratings in the WordPress repository. It gives you an idea of its performance and reliability.
- Test in a Staging Environment: Before you install a new plugin on your live website, test it in a staging environment. It helps you identify any potential issues before they affect your live site.
SEO and Marketing
Building a website is just the first step. To truly succeed, one must ensure that the website reaches its intended audience. This is where Search Engine Optimization (SEO) and marketing come into play.
On-page SEO Best Practices for WordPress
- Optimized Titles and Meta Descriptions: These are the first things users see in search results. Ensure they are compelling and contain your target keywords.
- High-Quality Content: Content is king. Regularly update your website with relevant, high-quality content that answers users’ queries.
- Mobile Optimization: With a significant portion of users accessing websites from mobile devices, ensure your site is mobile-friendly.
- Internal Linking: Linking to other relevant content on your site can help search engines understand the context and relevance of your content.
- Image Optimization: Ensure images are compressed and have relevant alt tags. This improves page load times and helps in image search rankings.
Content Marketing and Social Media Strategies
- Consistent Blogging: Regularly publishing high-quality blog posts on blog page can establish your website as an authority in your niche. It also provides fresh content for search engines to index.
- Engage on Social Media: Platforms like Facebook, Twitter, and Instagram can be powerful tools to drive traffic to your website. Share your content, engage with followers, and use relevant hashtags to increase visibility.
- Email Marketing: Building an email list and sending out newsletters can be an effective way to keep your audience engaged and drive repeat traffic to your site.
- Collaborate with Influencers: Partnering with influencers in your niche can help you reach a broader audience. Whether it’s guest blogging or social media shoutouts, collaborations can boost your website’s visibility.
Utilize Advanced WordPress Capabilities
Setting the Stage for eCommerce Success
Making an online store is a necessity for businesses aiming to tap into a global market. With WordPress, setting up an eCommerce platform is more accessible than ever. WooCommerce is the go-to solution for many WordPress users. It’s a free plugin that transforms your website into a fully functional online store. Here’s a step-by-step guide to harnessing its potential:
- Installation and Activation: Navigate to ‘Plugins’ in your WordPress dashboard, search for WooCommerce, and click ‘Install Now’. Once installed, activate it.
- Setup Wizard: After activation, WooCommerce will launch a setup wizard to help you configure your store’s basics – location, currency, payment methods, and more.
- Adding Products: Go to ‘Products’ and click ‘Add New’. Here, you can add product names, descriptions, images, and set prices. WooCommerce also allows for product variations, like sizes or colors.
- Payment Gateways: WooCommerce supports various payment methods. From PayPal to Stripe, choose what suits your business best. Ensure your chosen method supports transactions in your region.
- Shipping & Tax Settings: Depending on where you’re selling, you might need to configure shipping rates and tax settings. WooCommerce provides zones to make this process more manageable.
Enhancing the Shopping Experience
A successful online store isn’t just about listing products. It’s about the overall user experience. Here are some ways to enhance it:
- Product Reviews: Allow customers to leave reviews. Positive feedback can boost sales, while constructive criticism can offer insights for improvement.
- Recommendations: Use plugins that suggest products based on what the customer is viewing. This can increase sales and improve user experience.
- Seamless Checkout: Reduce the steps needed to complete a purchase. The easier it is, the more likely customers will finalize their purchase.
Monetizing Your Website
While passion might be the driving force behind your website, monetization can provide the resources to maintain and grow it.
Exploring Ways to Earn from Your Site
- Affiliate Marketing: Promote products relevant to your content and earn a commission for every sale made through your referral link.
- Ad Networks: Platforms like Google AdSense display ads on your site, and you earn based on views or clicks.
- Sponsored Content: Collaborate with brands to create content that promotes their products or services.
- Sell Digital Products: Offer e-books, courses, or premium content to your audience.
- Writers and Publishers: Earn Money on WordPress.com: If you’re on WordPress.com, take advantage of their WordAds program. It allows you to display ads on your site and earn revenue based on views.
Keeping Your Website Secure and Updated
Security and regular updates ensure your site runs smoothly, remains accessible to your audience, and is protected from potential threats.
Basic WordPress Security Practices
- Choosing Strong Passwords: Avoid obvious passwords like “password123”. Use a mix of upper and lower case letters, numbers, and symbols. Consider using password managers for added security.
- Regular Backups and Updates: Ensure you have a recent backup of your site. Platforms like UpdraftPlus can automate this process. Regularly update your WordPress version, themes, and plugins to patch any vulnerabilities.
Regular Maintenance
Maintaining your website is akin to servicing a car. Regular check-ups ensure optimal performance and longevity.
Why Updates Are Crucial?
- Security: New updates often fix security vulnerabilities.
- Performance: Updates can offer improved speed and functionality.
- Bug Fixes: Resolve any issues or glitches that might affect user experience.
Monitoring Website Health and Performance
Use tools like Google Analytics to track visitor behavior and site performance. Plugins like ‘Health Check & Troubleshooting‘ can provide insights into your WordPress site’s health.
Launching Your Website
Launching a website is the culmination of all your efforts in building and designing it. It’s the moment when your site goes live and becomes accessible to the world. But before you hit that launch button, there are several crucial steps to ensure a smooth and successful launch.
Final Checks and Preparations
Before launching, it’s important to make some final checks and preparations. This phase ensures that your website offers the best user experience and meets all the technical requirements.
- Ensuring mobile responsiveness: With the majority of users accessing websites from mobile devices, it’s crucial to ensure that your site looks and functions well on all screen sizes. This means checking layouts, images, and interactive elements to ensure they adapt seamlessly to mobile screens.
- Speed optimization tips: A fast-loading website not only provides a better user experience but also ranks higher on search engines. This involves compressing images, leveraging browser caching, and minimizing code, among other techniques.
Going Live
The moment of truth! Going live means making your website accessible to the public. But it’s more than just pressing a button.
Steps to launch your website: This involves a checklist of actions, such as setting your domain’s DNS settings, removing any ‘under construction’ pages, and ensuring all links and functionalities work as intended.
Encouraging feedback and engagement: Once live, gather feedback from users to identify any overlooked issues or areas of improvement. Encourage interactions through comments, forums, or feedback forms. Engaging with your audience not only helps in refining your website but also in building a loyal community around it.
Sum Up
And there you have it! A step-by-step roadmap to crafting your very own WordPress website. Remember, a website is more than just a digital address; it reflects your passion, brand, and vision. There’s so much more you can do with WordPress to enhance your website and offer more value to your audience. For example, you can create an LMS website on WordPress and sell online courses, set up an e-commerce store to showcase your products, integrate a booking system for appointments, create a non-profit website, or even start a blog to share your insights and expertise. With WordPress by your side and this guide in hand, you’re well-equipped to make your mark in the digital realm. So, let your website be the beacon that guides your audience to you. The digital world awaits your masterpiece.


How to Build a WordPress Website: Best Guide in 2023