Overview
Running an eCommerce store with Magento can be a highly lucrative venture. However, success comes with a price, and that price is ensuring the security of your website. Cyber-attacks are on the rise today, and Magento security is more critical than ever to protect your customers’ sensitive information and your business’s reputation.
As the saying goes, prevention is better than cure, so taking action and reinforcing your website’s security measures is essential. That’s why it’s vital to strengthen your site’s security and ensure its resilient against potential security breaches.
13 Best Practices to Improve Magento Security

1. Implement a Web Application Firewall
Adding a top-level Web Application Firewall (WAF) will provide protection by filtering and monitoring HTTP traffic between your Magento store application and the internet. This includes protection from cross-site scripting (XSS) attacks, SQL injections, and zero-day attacks. Recommended WAF providers include Cloudflare, Sucuri, and Incapsula. We recommend Cloudflare’s Pro plan which is $25 per month per domain.
How to enable Cloudflare WAF Protection?
- Log in and sign up for Cloudflare’s Pro plan
- Click on your domain name
- In the left-hand column, click DNS –> Records
- Edit the DNS record for your domain name and ensure the Orange Cloud is enabled. You will see the word “Proxied”

- In the left-hand column, click Security –> WAF
- Click the Managed Rulesets tab
- Enable your rulesets, we recommend Cloudflare Managed Ruleset.

Enabling WAF protection will offer great security benefits, protect your web site from attacks, and help thwart carding style attacks on e-commerce based sites like Magento.
2. Keep Magento Up to Date
Hackers are always looking for vulnerabilities in Magento stores to exploit, and outdated software provides an easy target. To prevent these security issues, Magento developers immediately monitor and release important Magento security updates when they identify a risk.
Install All Security Patches
Magento has released several important security patches to address security risks that could potentially compromise the security of your Magento site. Magento security patches aim to resolve the security risks of Magento sites and prevent unauthorized access and malicious attacks.
Magento’s Latest Version
Magento releases regular software upgrades and security patches to enhance performance, fix issues and introduce new features to the platform. The latest version of Magento 2 is 2.4.6, released on March 14, 2023. It includes enhancements and support for PHP 8.2, which will help with performance.
The longer you delay upgrading to the latest version, the higher the risk of cyber-attacks and Magento site breakdowns. These attacks are used to inject malicious JavaScript code into online stores. Keeping your Magento store up to date ensures that your store is secure and stable and provides the latest features and enhancements.
Simply put: whenever there are any updates or security patches available for your store (which happens often), make sure you download them without delay!
Adobe Commerce has announced the release of version 2.4.5 in their official tweet:
3. Use Magento Security Scan Tool
Using the Magento Security Scan Tool, you can rest assured that your online store is actively monitored for potential security threats. It is a free tool provided by Adobe to help Magento store owners identify potential security risks and vulnerabilities in their websites. The tool scans your website for security threats and provides you with a report on the security status of your website.
The scan results are presented in an easy-to-read report that shows the severity of security issues found, along with suggestions for how to fix them.
Magento Security Scan is available to all Magento store owners, regardless of whether they use the free Community Edition or the paid Enterprise Edition. However, to use the tool, you must create an Adobe account and provide basic information about your website.
With regular scans and historical reports, you can ensure that your own eCommerce platform or site stays secure and your customer’s information remains safe.
Scanning Possible Security Risks
The security scan checks for various security risks, such as:
- Malware and other malicious code
- Vulnerabilities in the Magento software or installed extensions
- Outdated software versions and security patches that attackers can exploit
- Weak passwords and other authentication issues
- Insecure server configurations
Setting up Magento Security Scan Tool
Here are steps to set up the Magento Security Scan Tool:
Step 1: Go to the Commerce home page and sign in to your Commerce account.
Step 2: Choose “Security Scan” in the left panel.
Step 3: Read and accept the Terms and Conditions.
Step 4: Add your website to the Monitored Sites list by generating a confirmation code and pasting it into the designated location in your storefront.
Step 5: Configure the Set Automatic Security Scan options for weekly or daily scans.
Step 6: Enter your email address to receive notifications of completed scans and security updates.
Step 7: Click “Submit” to complete the setup process.
4. Use Non-Default Admin URL
Using a default Admin URL, you’re practically rolling out a red carpet to hackers, inviting them to launch an automated password-guessing attack on your Magento admin panel. It’s like leaving the front door unlocked for intruders! Don’t fall victim to brute force attacks. Instead, change the default admin route to a unique name that is harder to guess. Avoid using easily guessable Magento admin login paths such as “/admin/” and choose a unique name that will be harder to crack.
A simple admin URL makes it easier for hackers to launch large-scale automated attacks on your Magento site. While using a non-default admin URL will not fully secure your site, it can help prevent these attacks.
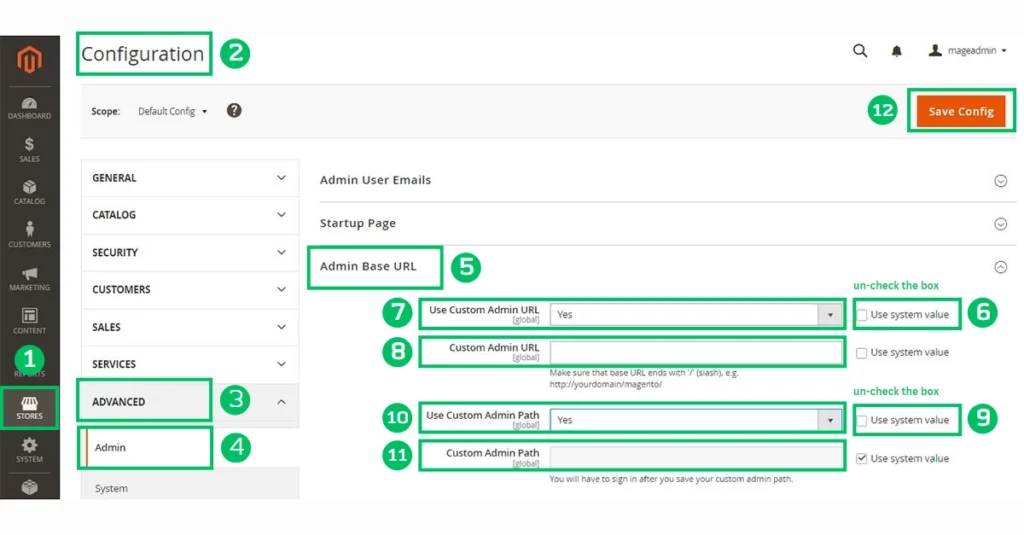
To change the default admin URL:
- On the Admin sidebar, go to Stores > Settings > Configuration.
- In the left panel, expand Advanced and choose admin.
- Expand the Admin Base URL section.
- Set the configuration options for the custom URL:
- Set Use Custom Admin URL to Yes.
- Enter the Custom Admin URL.
- Set Custom Admin Path to Yes.
- Enter the Custom Admin Path.
- Click Save Config.
After making changes to the admin URL, it is recommended to clear the Magento cache for the changes to take effect.
5. Enable reCAPTCHA
While the standard Adobe Commerce and Magento Open-Source CAPTCHA work fine, Google reCAPTCHA provides enhanced security options and methods.
Using Google reCAPTCHA is a foolproof way of blocking spam and keeping you safe from attackers. It works by determining if the access session being initiated on your site is done by a bot or human being to ensure genuine and secure site logins. Google reCAPTCHA provides enhanced website security with various display options and methods.
Most website owners use it to defend against attacks like dictionary attacks and to ensure that search engine spiders only crawl essential pages on the site to avoid spam content that can put sensitive data or the database at risk of exploitation by malicious criminals.
ReCAPTCHA Configuration
Google reCAPTCHA can be configured separately for the admin and storefront.
ReCAPTCHA Configuration for the admin:
For the admin, it can be used on the Sign In page and when a user requests a password reset.
ReCAPTCHA Configuration for the Storefront:
For the storefront, it can be used in numerous locations, such as signing into a customer account and sending a message from the Contact Us page.
Before configuring Google reCAPTCHA, check the necessary setting that may require developer assistance. Also, note that not all keys apply to all types of reCAPTCHA, and misapplying them could lead to unexpected behaviour.
To enable reCAPTCHA, follow these steps:
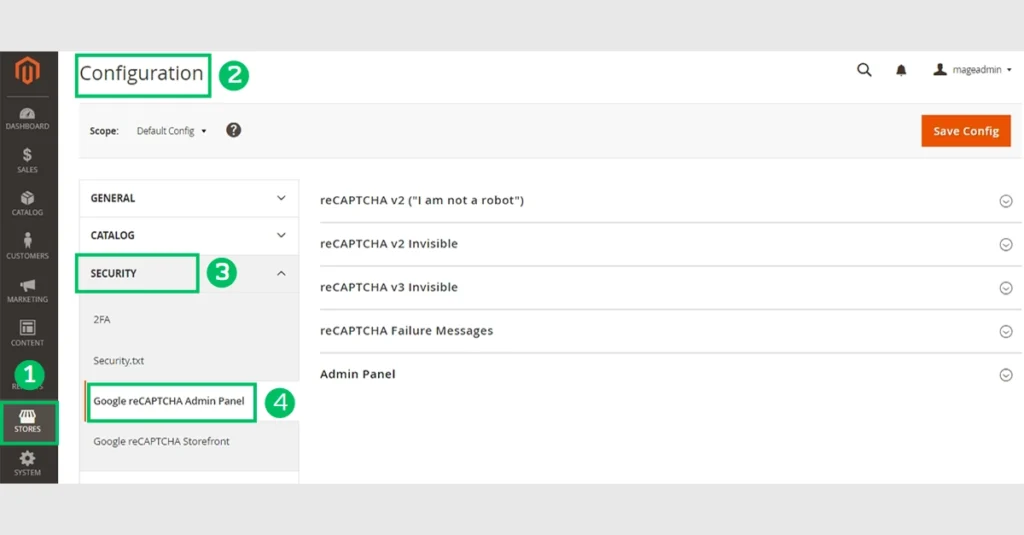
Step 1: Navigate to Stores > Configuration > Security > Google reCAPTCHA.
Step 2: Generate API keys by visiting the reCAPTCHA site and logging in to your account.
Step 3: Choose the type of reCAPTCHA you want to use and enter your store’s domain.
Step 4: Clear the Use system value checkbox for each field you want to configure in the admin panel.
Step 5: Enter the website key and secret key that was created for your reCAPTCHA type.
Step 6: Choose the size and theme of the reCAPTCHA box, as well as the language code you want to use.
6. Use 2FA (Two-Factor Authentication)
Implementing Two-Factor Authentication (2FA) Admin logins in Magento is a simple yet effective way to improve the Magento admin login security. 2FA is a security measure that requires users to provide two forms of identification (such as a password protection and a security code) before granting access to sensitive data or systems. By adding an extra layer of security, you can protect sensitive customer data, making it harder for hackers to gain unauthorized access.
In Magento, 2FA is a security extension that applies to Admin UI users only; it does not apply to storefront customer accounts.
Enabling Two-Factor Authentication in Magento Site
To enable 2FA in Magento, follow these steps:
Step 1: Log in to the Admin panel of your Magento store.
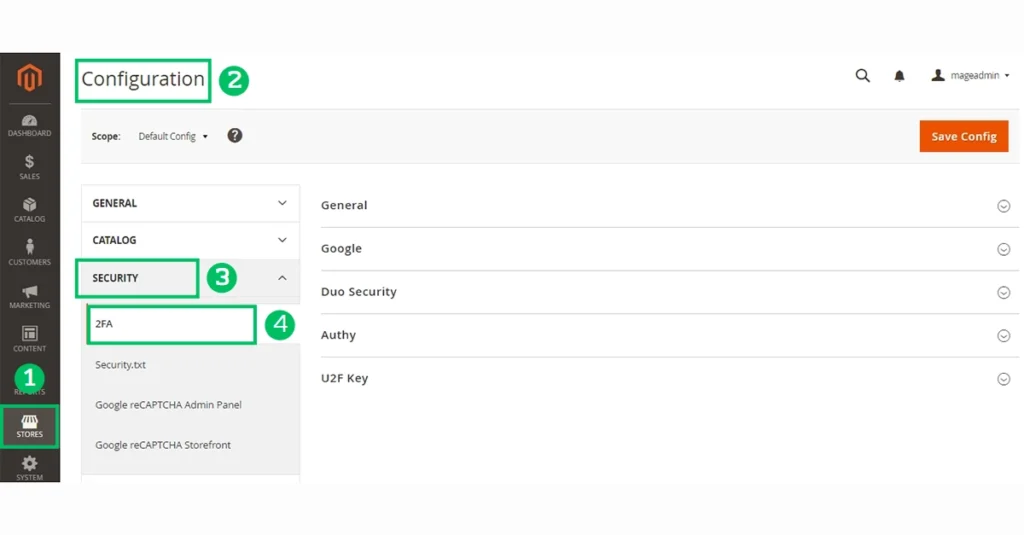
Step 2: Navigate to Stores > Configuration > Security > 2FA.
Step 3: Select the checkbox “Enable Two-Factor Authentication” to enable it.
Supported Authenticators
Magento 2FA supports multiple authenticators to suit your security needs. Here are some of the supported authenticators:
- Google Authenticator: Generates a code from a mobile app.
- Duo Security: Supports SMS and push notification authentication.
- Authy: Supports SMS, call, token, and one-touch Authentication.
- U2F Keys: Uses a physical device like YubiKey.
Enabling and configuring an authenticator is essential after enabling and configuring 2FA for your Magento instance.
Managing Two-Factor Authentication in Magento
Magento 2FA provides comprehensive tools for managing and configuring authenticator settings globally or per user account. Administrators have the following options:
- Review existing authenticators configured per user account.
- Require specific authenticators.
- Reset or remove authenticators to resolve access issues.
- Revoke access for devices to resolve access issues.
Troubleshooting Two-Factor Authentication Issues
If you are having trouble signing in to the admin with 2FA, consider the following:
- Try synchronizing the time settings on the device and server or resetting the authenticators associated with the account.
- Clear the web cache and cookies for the Magento installation, as authenticators like Google use generated cookies to save access and duration.
- Add a rule to your browser that allows cookies for your Magento installation to prevent blocking cookies, which may prevent some authenticators from completing the verification process.
7. Audit Admin User Accounts
Admin user accounts are a critical aspect of Magento security. As an administrator, you must regularly audit and review the user accounts in your system.
You can take the following steps to maintain the security of Admin user accounts:
Remove Unknown Admin Accounts
Remove unknown admin accounts to your system files ensure only authorized users can access your system. Keep a record of all removed accounts for your records.
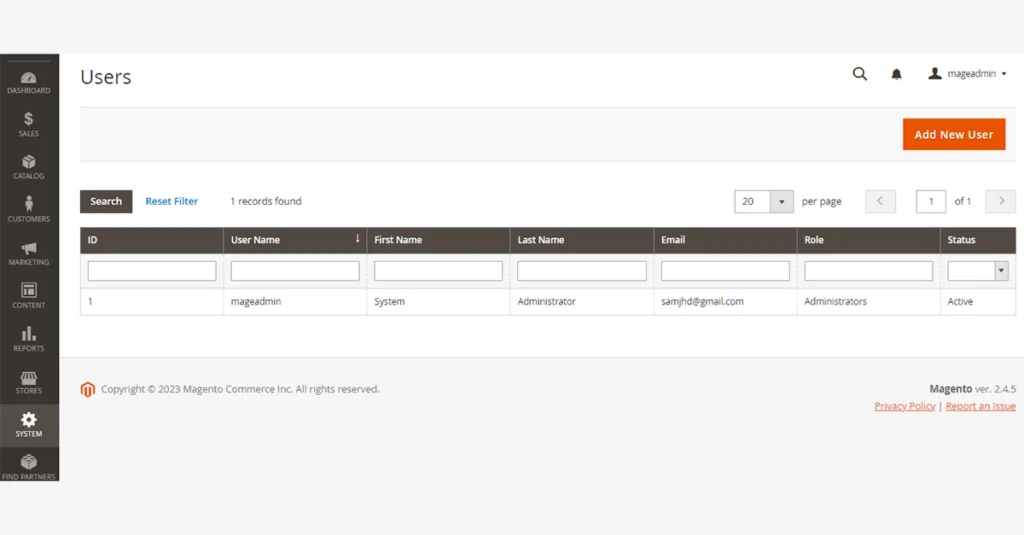
To Begin, navigate to the Admin panel of your production site and remove any unknown Admin accounts from system> Permissions > All Users.
Remove Unused Accounts
Remove any unknown or unused accounts, including API accounts. Be sure to keep a record of all removed accounts for your records to ensure that you do not delete any essential accounts accidentally.
Change Passwords and Usernames
Changing passwords on all known Admin accounts and renaming overly generic admin usernames to unique names is also a good step to ensure Magento security.
Avoid using common words like “administrator,” “superuser,” or “root,” as these can be easy targets for attackers. Use a unique username and a strong password, a combination of letters, numbers, and symbols.
Manage Admin User Accounts
When your Magento store is installed, a default administrator account is created with login credentials that give you full administrative access. As a best practice, you should create another user account with full Administrator access. This way, you can use one account for your everyday administrative activities and reserve the other as a “Super Admin” account. This can be helpful if you forget your regular credentials or they become unusable.
Create separate user accounts for team members or service providers who need access and assign restricted access based on their business need to know. Set an expiration date for temporary accounts.
Create a User
To create a user, follow these steps:
- On the Admin sidebar, go to system> Permissions > All Users.
- In the upper-right corner, click Add New User.
- Add the necessary Account Information.
- Set This Account to Active.
- Click the calendar icon to set the Expiration Date for the user account. Defining an expiration date is helpful when a user or role is temporary. After the expiration date, the user account status changes to Inactive and can be updated if needed.
- Under Current User Identity Verification, enter your user account password.
To limit the websites or stores, users can restrict access in the admin, create a role with limited scope and only the necessary resources selected, and assign the role to a specific user account.
Assign a User Role
Assigning user roles in Magento involves the following process:
- Log in to your Magento Admin Panel using your login credentials.
- Click on the “System” tab in the main navigation menu and select “Permissions” from the drop-down list.
- In the “Permissions” section, click on “Roles”.
- Click on “Add New Role” to create a new role.
- Enter the role name and description.
- Under the “Role Resources” section, select the resources that the role should have access to. Resources include catalogues, customers, sales, and other admin areas.
- Click on the “Save Role” button to save the new role.
- After creating the role, you need to assign it to a user. To do this, click the “Users” tab in the “Permissions” section.
- Click the “Add New User” button and enter the required information, such as user name, email, and password.
- Under the “User Role” section, select the role you just created and click the “Save User” button.
8. Update Admin Account Security
Updating Admin account security can help ensure Magento security; limiting the number of password reset requests and setting the maximum login failures before the account gets locked out is essential. Adobe suggests that you set the lockout time to at least 30 minutes.
You can configure these settings quickly through the admin panel by navigating to:
Stores > Configuration > Advanced > Admin > Security.
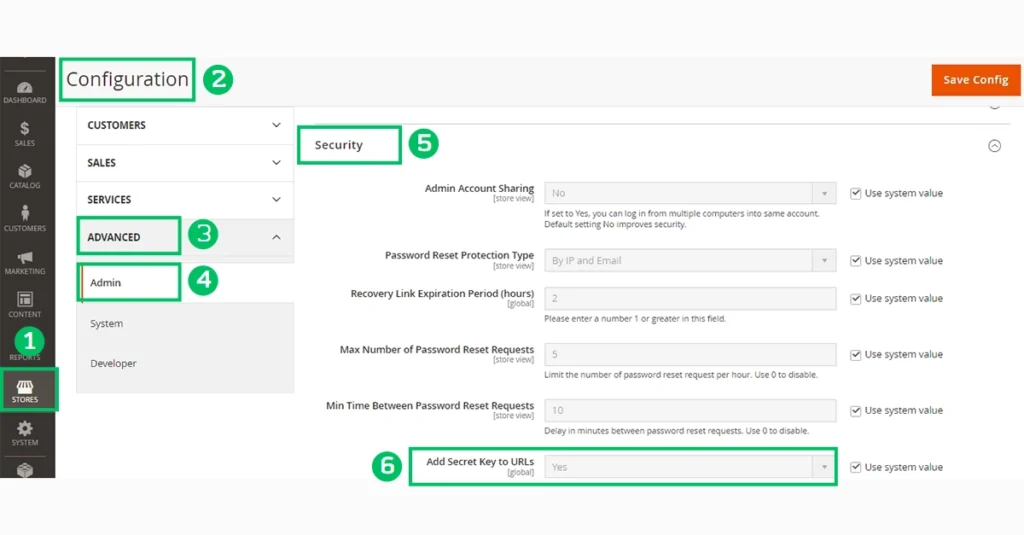
Key security settings
Some of the key settings you can configure include:
- Secret Key to URLs: Add a secret key to the Admin URL as a precaution against exploits.
- Case-Sensitive Passwords: Requires that upper- and lowercase characters in any login information entered match what is stored in the system.
- Admin Session Lifetime: Determines the length of an Admin session before it times out.
- Maximum Login Failures to Lockout Account: Determines the number of times a user can try to log in to the admin before the account is locked.
- Lockout Time: Determines the number of minutes an Admin account is locked when the maximum number of attempts is met.
- Password Lifetime: Determines the number of days a password is valid.
- Password Change: Determines whether Admin users are forced or recommended to change their passwords after the account setup.
9. Use HTTPS / SSL Encryption
For Magento sites, Use HTTPS / SSL encryption to protect sensitive information such as login details, credit card details, and personal information.
SSL is a security protocol that encrypts all data between your store and the browser. It also allows you to set up a dedicated domain for your website, meaning only those with the right credentials can access it.
Setting up HTTPS / SSL is essential for ecommerce sites because it increases trust in your site and makes it more difficult for intruders to break into it. HTTPS / SSL certificates can boost customer confidence when shopping.
When building a new website, launching it using HTTPS from the start is a good idea. Google has already taken the initiative and now considers HTTPS a ranking factor. For those who already have an existing website, upgrading the entire site to run over a secure, encrypted HTTPS channel is recommended.
Without SSL encryption, your website is vulnerable to cyber threats such as phishing attacks, man-in-the-middle attacks, and data breaches.
Implementing HTTPS/SSL Encryption on Your Magento Store
To set up HTTPS/SSL encryption on your Magento store, follow these simple steps:
1. Install an SSL Certificate:
The first step to implementing SSL encryption is to install an SSL certificate. Adobe Commerce provides a Domain-Validated Let’s Encrypt SSL/TLS certificate to serve secure HTTPS traffic from Fastly.
Adobe provides one certificate for each Adobe Commerce on cloud infrastructure Pro plan architecture, Staging, and Adobe Commerce on cloud infrastructure Starter plan architecture environment to maintain secure systems for all domains in that environment.
If you own a certificate, upload it using an SFTP (SSH File Transfer Protocol) client to a web-inaccessible file location on your server and submit a support ticket letting them know the file path.
If you have your own cPanel server, you can generate an SSL certificate using the cPanel AutoSSL function.
It’s important to note that the certificate name must match the primary hostname named by the first URL.
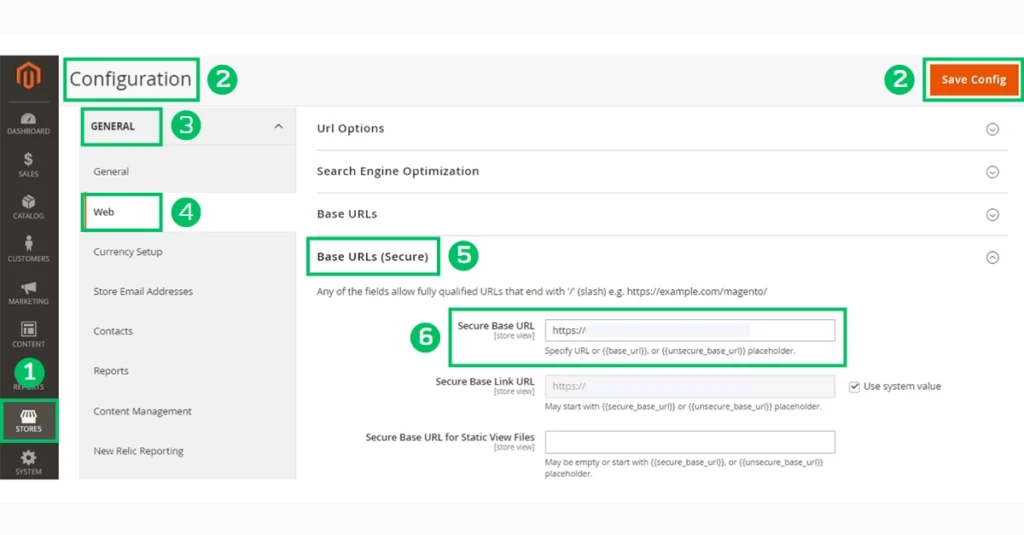
2. Update the Unsecure Base URL
After installing the SSL certificate,
- Log in to the admin dashboard of your Magento store.
- Navigate to Stores > Settings > Configuration > General > Web.
- Update the secure base URL to “https” and click on Save Config.
This will ensure that all future requests to your website use SSL encryption.
3. Verify Your SSL Setup:
Finally, verify that your SSL setup is working correctly. You can use an online SSL checker tool to check that your SSL certificate is valid and that there are no security vulnerabilities on your website.

10. Implement Security Extensions
Many security extensions are available that can help in enhancing Magento security. These extensions provide an additional layer of security to existing IT infrastructure of your Magento installation and prevent potential threats and vulnerabilities from being exploited.
Consider using extensions that provide malware scanning, security alerts, and two-factor Authentication.
How to Choose Security Extensions
Choosing the right security extensions for your Magento store can be challenging, especially if you need to become more familiar with the features and functionality of the options available.
Here are some tips to help you select the best security extensions for your online store:
Consult a Solution Integrator:
A solution integrator (SI) specialist can advise you on your Magento store’s most appropriate security extensions. Ensure that your SI is well-versed in security and has a proven track record of dealing with security issues.
Use Trusted Vendors:
Use extensions that come from trustworthy vendors. Adobe recommends only sourcing extensions from the Adobe Commerce Marketplace or your solution integrator. This can help ensure the security and stability of your online store.
Limit the Number of Extensions:
Limiting the number of magento extensions that you use can reduce your risk exposure. The more extensions you use, the more potential vulnerabilities you introduce to Magento security.
Review Extension Code:
Review the extension code or security patch before integrating it into Magento installation. You can also consult with your solution integrator to review the code.
Adobe offers a wide range of extensions for Magento stores.
11. Protect Against Data Leaks from Browser Extensions
No doubt browser extensions help enhance your browsing experience; however, it can pose a significant security risk to your e-commerce store. Recent DataSpii leaks found that some browser extensions can take data from page titles and URLs, potentially exposing sensitive data.
What is DataSpii?
DataSpii is a leak that compromised the private data of millions of Chrome and Firefox users through at least eight browser extensions, including popular ones like Hover Zoom, SpeakIt!, and SaveFrom.net Helper.
This leak impacted government agencies and major corporations, exposing sensitive information such as personally identifiable information (PII), corporate information (CI), and government information (GI). This data was intercepted and sent to foreign-owned entities, putting many organizations at risk.
Prevent Browser Extensions from Leaking Sensitive Data
To protect your Magento store against browser extension vulnerabilities, consider the following tips:
Monitor the use of browser extensions:
Only allow trusted browser extensions to be installed and used by your team. Ensure your team is trained to identify and avoid extensions that could pose a security risk.
Review the permissions of installed extensions:
Review the permissions of all installed extensions regularly and only grant the correct file permissions. Ensure extensions are only granted access to the data they require to function.
Limit the use of extensions on sensitive pages:
Avoid extensions on pages containing sensitive data, such as login and payment pages.
Remove unnecessary extensions:
Remove extensions that are no longer required to reduce the attack surface of your Magento store.
Avoid including sensitive data in page titles and URLs:
Be mindful of including sensitive information in page titles and URLs, as browser extensions can easily capture these.
12. Use a WAF (Web Application Firewall)
WAFs are designed to protect your website from various cyber threats such as SQL injection, cross-site scripting (XSS), and other attacks. It sits between your website and the internet, monitoring incoming traffic and blocking malicious requests before they can reach your web server.
A WAF service like the one that Cloudflare offers provides an extra layer of protection for your Magento store by filtering all incoming web traffic against predefined rules. Any request that doesn’t comply with the ruleset will be automatically blocked, preventing potential attacks from reaching your website.
The WAF ruleset is constantly updated by a team of top security researchers and experts always looking for new attacks and vulnerabilities. This ensures Magento security against the latest threats, even if you don’t have a dedicated security team.
13. Secure Ecommerce Sites with a Strong Magento Hosting Plan
Many e-commerce startups are lured by the low cost and easy setup of shared hosting plans, not realizing that they’re putting their store at risk.
So what’s the solution? Managed cloud hosting providers offer a more secure and reliable option for Magento stores. When selecting a hosting provider, consider factors such as server speed, uptime, security features, and customer support.
With the best Magento hosting provider, you get the benefits of cloud hosting, including automatic scaling, high availability, and robust security measures like frequent server-level patches and malware scanning.
Stay away from hosting plans that promise the moon but deliver little. Choose a hosting provider that understands the unique Magento security challenges, and invest in a hosting plan that will give your store the best chance of success.
Final Thoughts
Investing in reliable hosting providers, and implementing the recommended security measures is essential to safeguard your online business from potential cyber threats. With the ever-increasing number of online attacks, it’s not a matter of if but when your website will be targeted. By following the tips we’ve outlined, you can harden your Magento website, protect your customers’ sensitive data, and ensure the continuity of your business. Please don’t wait until it’s too late; take action to improve Magento security and gain peace of mind.


13 Essential Magento Security Tips to Protect your Store